Showing posts with label Dessert. Show all posts

Saturday, December 15, 2012

Peppermint Bark

It's Christmas time which means it's a time for sharing and receiving. I love the "sharing" part in the Holidays the most. Every year for the past couple of year I make Peppermint Bark to give away as treats to the kid's teachers and friends. It's easy to make and if you love peppermint ,you'll definitely love this sweet treat. There are different variations of this recipe found online but I have found using candy melts easier than using white chocolate. The melting is so quick and you really can't go wrong with it. You can mix white and milk chocolate to make fancier looking peppermint bark. To me, simpler is better!

Ingredients
Wilton Candy Melts(white)-2 bags
You can find these at Walmart, Michaels or any other craft store
Peppermint extract- 1tsp
Bob's Candy Cane-1 box(12 candies)

Directions
1.Crush the candy canes in a Ziploc and keep them aside.
2. Using the double boiler method I melt the candy melts. (Boil water and place the candy melts in another bowl and place over the boiling water. Turn the flame low, and mix the candies till they are nice and smooth) The candy melts come with microwavable directions too, which can be followed as well.
3. Add the peppermint extract and mix well. Take the mixture off the heat.
4. Line a baking sheet with parchment paper and pour the mixture over and smooth it out evenly.
5. Immediately sprinkle the entire top with the crushed candy cane pieces. Cover evenly and then refrigerate for 20-30 minutes.
6. Break them into pieces and store in an airtight container. When storing use parchment paper to remove any excess moisture.It's that simple!
I love using festive tins lined with parchment paper or even holiday themed treat bags to gift them in.
Can't wait for next week to share them with all our loved one. Happy Holidays !!! Happy Snacking !!!

Wednesday, November 14, 2012

Hershey Kiss Cookies

It has been a while since I added anything to the blog. The past couple of  months have been busy. In a couple more weeks I'll be more regular with the postings,I hope The blog has been neglected , I know.
I remember making these cookies for a bake sale when I was at Franklin Avenue Elementary School back in the day. The original recipe calls for peanut butter, but I wanted to try making it without it. The girls really don't like PB and it was a spur of the moment thing. My oldest daughter comes homes after school, telling me that it's Diwali-The Festival of Lights and that we Have to Celebrate! This festival is  very common in the northern parts of India and celebrated with sweets and firecrackers. Even though it isn't very significant down south in Kerala especially among Christian households, trying to make a 5 year old understand all that was too much of a hassle so I decided to make some anyway. If you're wondering, that's why the pictures of the cookies are alongside a "diya" or lamp.

Ingredients
Butter-1 cup
Sugar-1 cup
Egg-1
Vanilla extract-1 tsp
All Purpose Flour-1 1/4 cup
Unsweetened cocoa powder-3/8 cup
Baking powder-1/2 tsp
Salt-1/4 tsp
Sugar-1/6 cup (for decorating)
Hershey kisses-20

Method
1.Preheat oven to 350 degrees.
2.Cream together the sugar and the butter until its nice and fluffy.* Make sure the butter is at room temperature.
3.Next add the egg and vanilla extract and mix until smooth.
4.Now before adding your dry ingredients to the creamed mixture sift them to avoid any lumps.
5.Once all mixed, roll them into 1 inch balls and coat with the sugar and place in an ungreased cookie sheet spaced apart.
6.Bake for 8-10 minutes and cool on a wire rack and place the Hershey kiss into the center while they are still warm. We only did half the batch with the Hershey kiss, but they are delicious either way.
Enjoy!!!Happy Baking!!! The holidays are around the corner too, so Happy Holidays Everyone!!!

Thursday, September 6, 2012

Fried Plantain in Spring Roll Wraps

A very simple dessert taught to me by my dear friend of 20 years "T". We visited her a couple weeks ago and was surprised to eat this very scrumptious snack. It is very similar to the Kerala snack "Ethakkappam"- ripe plantains dipped in a batter of flour and cardamon and then fried to perfection. This however is from Thailand-fried banana in spring roll wrapper.Your everyday bananas are transformed into a heavenly delight - crispy on the outside, warm and melting on the inside. We substituted the yellow banana for the ripened yellow plantain(ethakka). 

Ingredients
Spring roll wrapper(small)-1 packet of 50
Ripe Plantains-3 (sliced very thin)
Honey
Oil-for frying

Directions
1. Cut the plantains into thin slices. One plantain should give you about 12-15 slices.
2. Take the wrapper and place in the refrigerator for a few hours before working with them. They are extremely thin and tear easily. Place a wet towel over the unused sheets, so they don't dry out in the process of making them.
3. Take one sheet at a time  and at the corner of the sheet place a slice of the plantain. Roll the ends a couple of times before folding in the sides and roll them shut. Put a dab of water on the end of the wrapper to help seal the fold.
4. Now in a shallow pan heat some oil and fry your plantains wraps. Once golden brown on the side flip and brown the other.
5. Once done drizzle with honey and enjoy warm. 
*You can sprinkle some toasted sesame seeds if you want.

This snack is great for those rainy weekends we always seem to get! Happy Snacking :) 

Thursday, July 12, 2012

Cake Pops

It is summer birthday season at home. My first born has a July birthday and second child an August birthday, so we usually have one big celebration somewhere in between. A lot of thought goes into the planning of these parties. Unlike my husband who thinks planning a party just requires a tray of biriyani and some liquor.LOL!!!I LOVE PARTY PLANNING!!! This year we are going to have it at an Indoor Moon bounce Place, but I wanted to make it special so I decided to try and make some 'Cake Pops" to add to the favor boxes. When I looked online I needed to get a mold (molds cost anywhere from $10 and up) to begin with and then you have to bake the cake pops before getting started, that's when I stumbled upon a blog for easy and simple baking. They use Munchkins or Doughnut Holes instead. I tried dipping these in frosting and chocolate chips but they didn't coat them well enough but Candy Melts along with some oil/butter gave me the correct consistency to coat the cake pops. These desserts are very sweet so get your "sweet tooth" ready! Decorating them is the fun part for kids and adults alike!

Ingredients
Munchkins( from Dunkin Doughnuts)-25
Wilton 8" lollipop sticks-25
Wilton Candy Melts-1 bag
Oil/Butter-1 tsp
Sprinkles
Styorofoam
(Once done and candy hardened you can individually wrap these cake pops and tie with ribbon to make them look pretty)

Directions
1.Melt the candy melts according to direction on the back. Add some oil/butter till the consistency is nice and smooth.

2.Take all the lollipop sticks and dip the end of the stick in some candy and refrigerate them for a minute or two till it hardens.

3.Next take each cake and roll them in the melted candy melt till coated evenly. Shake off the excess candy and decorate with sprinkles before placing them upright in styrofoam. (You can see mine are done in Pink and Purple the fav colors of my girls!)

4.After they cake pops have set and candy is hardened, bag them in individual treat bags and tie with ribbon.

5.They can be made a couple of days in advance. Make sure not to refrigerate them because they will cause condensation.

Hint-You can also get Wilton's treat bags from Michaels or A.C Moore along with some fancy ribbon to jazz them up. 

Wednesday, July 4, 2012

Mango Pie

I first had Mango Pie when I was working in a Mental Health facility in Detroit. We would have regular potlucks and the Indian psychiatrist Dr. L brought in these yummy mouth watering pies. When I heard "pie" I thought of maybe sliced mangoes in between light flaky pastry, but I was mistaken, this was more similar to a cheesecake. When I asked Dr. L for it's recipe she was more than happy to give it to me and hinted to me that was the easiest to make and was a no bake recipe too. It's been a while since I made this, have a Fourth of July BBQ to go to today and I thought why not make some! This time round I added some crushed cardamon for extra flavor. You don't need to if you don't like the taste!


Ingredients
Mango puree-30 oz(Deep Alphonsa Mango Puree)
Cream Cheese(Philadelphia-make sure it's at room temp)-8 oz
Cool Whip-8 oz tub
Unflavored Gelatin(Knox)-2 packets
Condensed Milk-1 can
Cardamon-2
Graham cracker pie crust(Keebler)-3


Directions
1.No need to preheat the oven. :) Take the cream cheese and using a hand mixer blend till smooth.


2.Add the mango puree and condensed milk and blend for a few minutes till you have a smooth mixture. Also powder 2 cardamons without the skins and add. Mix well.


3.Next take the two packets of gelatin and add 1/4 cup cold water and mix well. Then add a little less than 1/4 boiling hot water and mix till there are no lumps. Add this gelatin mixture to the mango mixture and blend again for a couple of minutes.


4.Next take the Cool Whip and fold the entire contents slowly. Don't use the blender,just fold it in with a spatula.

5.Once everything is well incorporated you can equally divide the mixture into the three pie crusts.


6.Cover and refrigerate for several hours before serving.


You can slice the pie and serve each slice with some cool whip for some extra flavor. Happy Cooking!

Tuesday, May 8, 2012

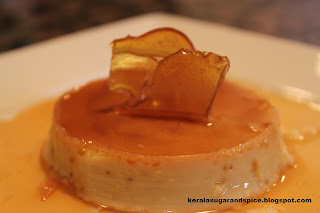
Caramel Pudding
"Heavenly and decadent" The two best words used to describe this Kerala dessert. Everyone and I mean everyone remembers their own 'love story' that they share with the caramel pudding. I just learned recently how to make it(courtesy Malayalam magazine-VANITHA) but since then has become an instant hit with the hubby and friends! This was the Show Stopper at this years Easter Gathering! Let me tell you up front, this dish is time consuming but worth the wait!!!


Ingredients

Milk-350 ml (approx-1.4 cups) 
Eggs-2
Vanilla essence- tsp
Sugar-10 tbsp
Water-2 tsp
(You will take 4 tbsp of the sugar to make a caramel)

Directions


1.First take 4 tbsp sugar and make caramel with 2 tsp water. Add some ghee to prevent sticking.This was told to me by a friend's mom.  The trick to getting the perfect caramel is never let your eye off it.You don't want it to burn and I would recommend using a stainless steel bottom heavy pan so you can see the color of the sugar changing. You must work fast with this and NEVER EVER stick your finger in it. I did the first time...OUCH!!!


2.Pour in glass dish and spread. Make sure the dish is oven safe. You can use individual ramekins too. This portion would fill 6 ramekins. 


3.Then boil the milk and let cool. 


4.Preheat the oven to 350 degrees. 


5.In the meantime beat 2 eggs with 6 tbsp sugar and vanilla.


6. Once the milk has cooled add the egg,sugar and vanilla mixture together and beat for another minute or so.


7. Then pour into the dish with caramel.Place the pudding dish in another dish larger that it and pour boiling hot water half way. Cover with aluminium foil and bake for about 40-45 minutes. If using ramekins the bake time would be close to 30 minutes. Make sure to keep an eye on it while baking ,you don't want to over do it.


8.To check readiness place a knife through it, if it comes clean take it out. Once cooled enough for you to handle cover with saran wrap (plastic wrap) and refrigerate for 3-4 hours.


9.Once set you can run a knife around the edge and place the dish in warm water to loosen and invert the pudding onto a plate. You don't need to invert it, it's still delicious served  straight out from the dish!!!


*The original recipe called for only 1/2 tsp of vanilla and 4 tbsp of sugar to be beaten with the egg and milk. But after I tried it like that didn't quite like the end result. The hubby suggested a bit more vanilla essence and sugar. He has got quite the "sweet tooth" you know.